This story started a few years ago when I was working as an intern into a PCB production facility. I had a great time there and after a few discussions with the CEO, he agreed on sharing some ressources for our skinny student competition at the time. (Many Galileo students got as Christmas gift hundred of 3.1mm milling bits)
After circling in their office like a vulture, I spotted an old milling machine left in a corner
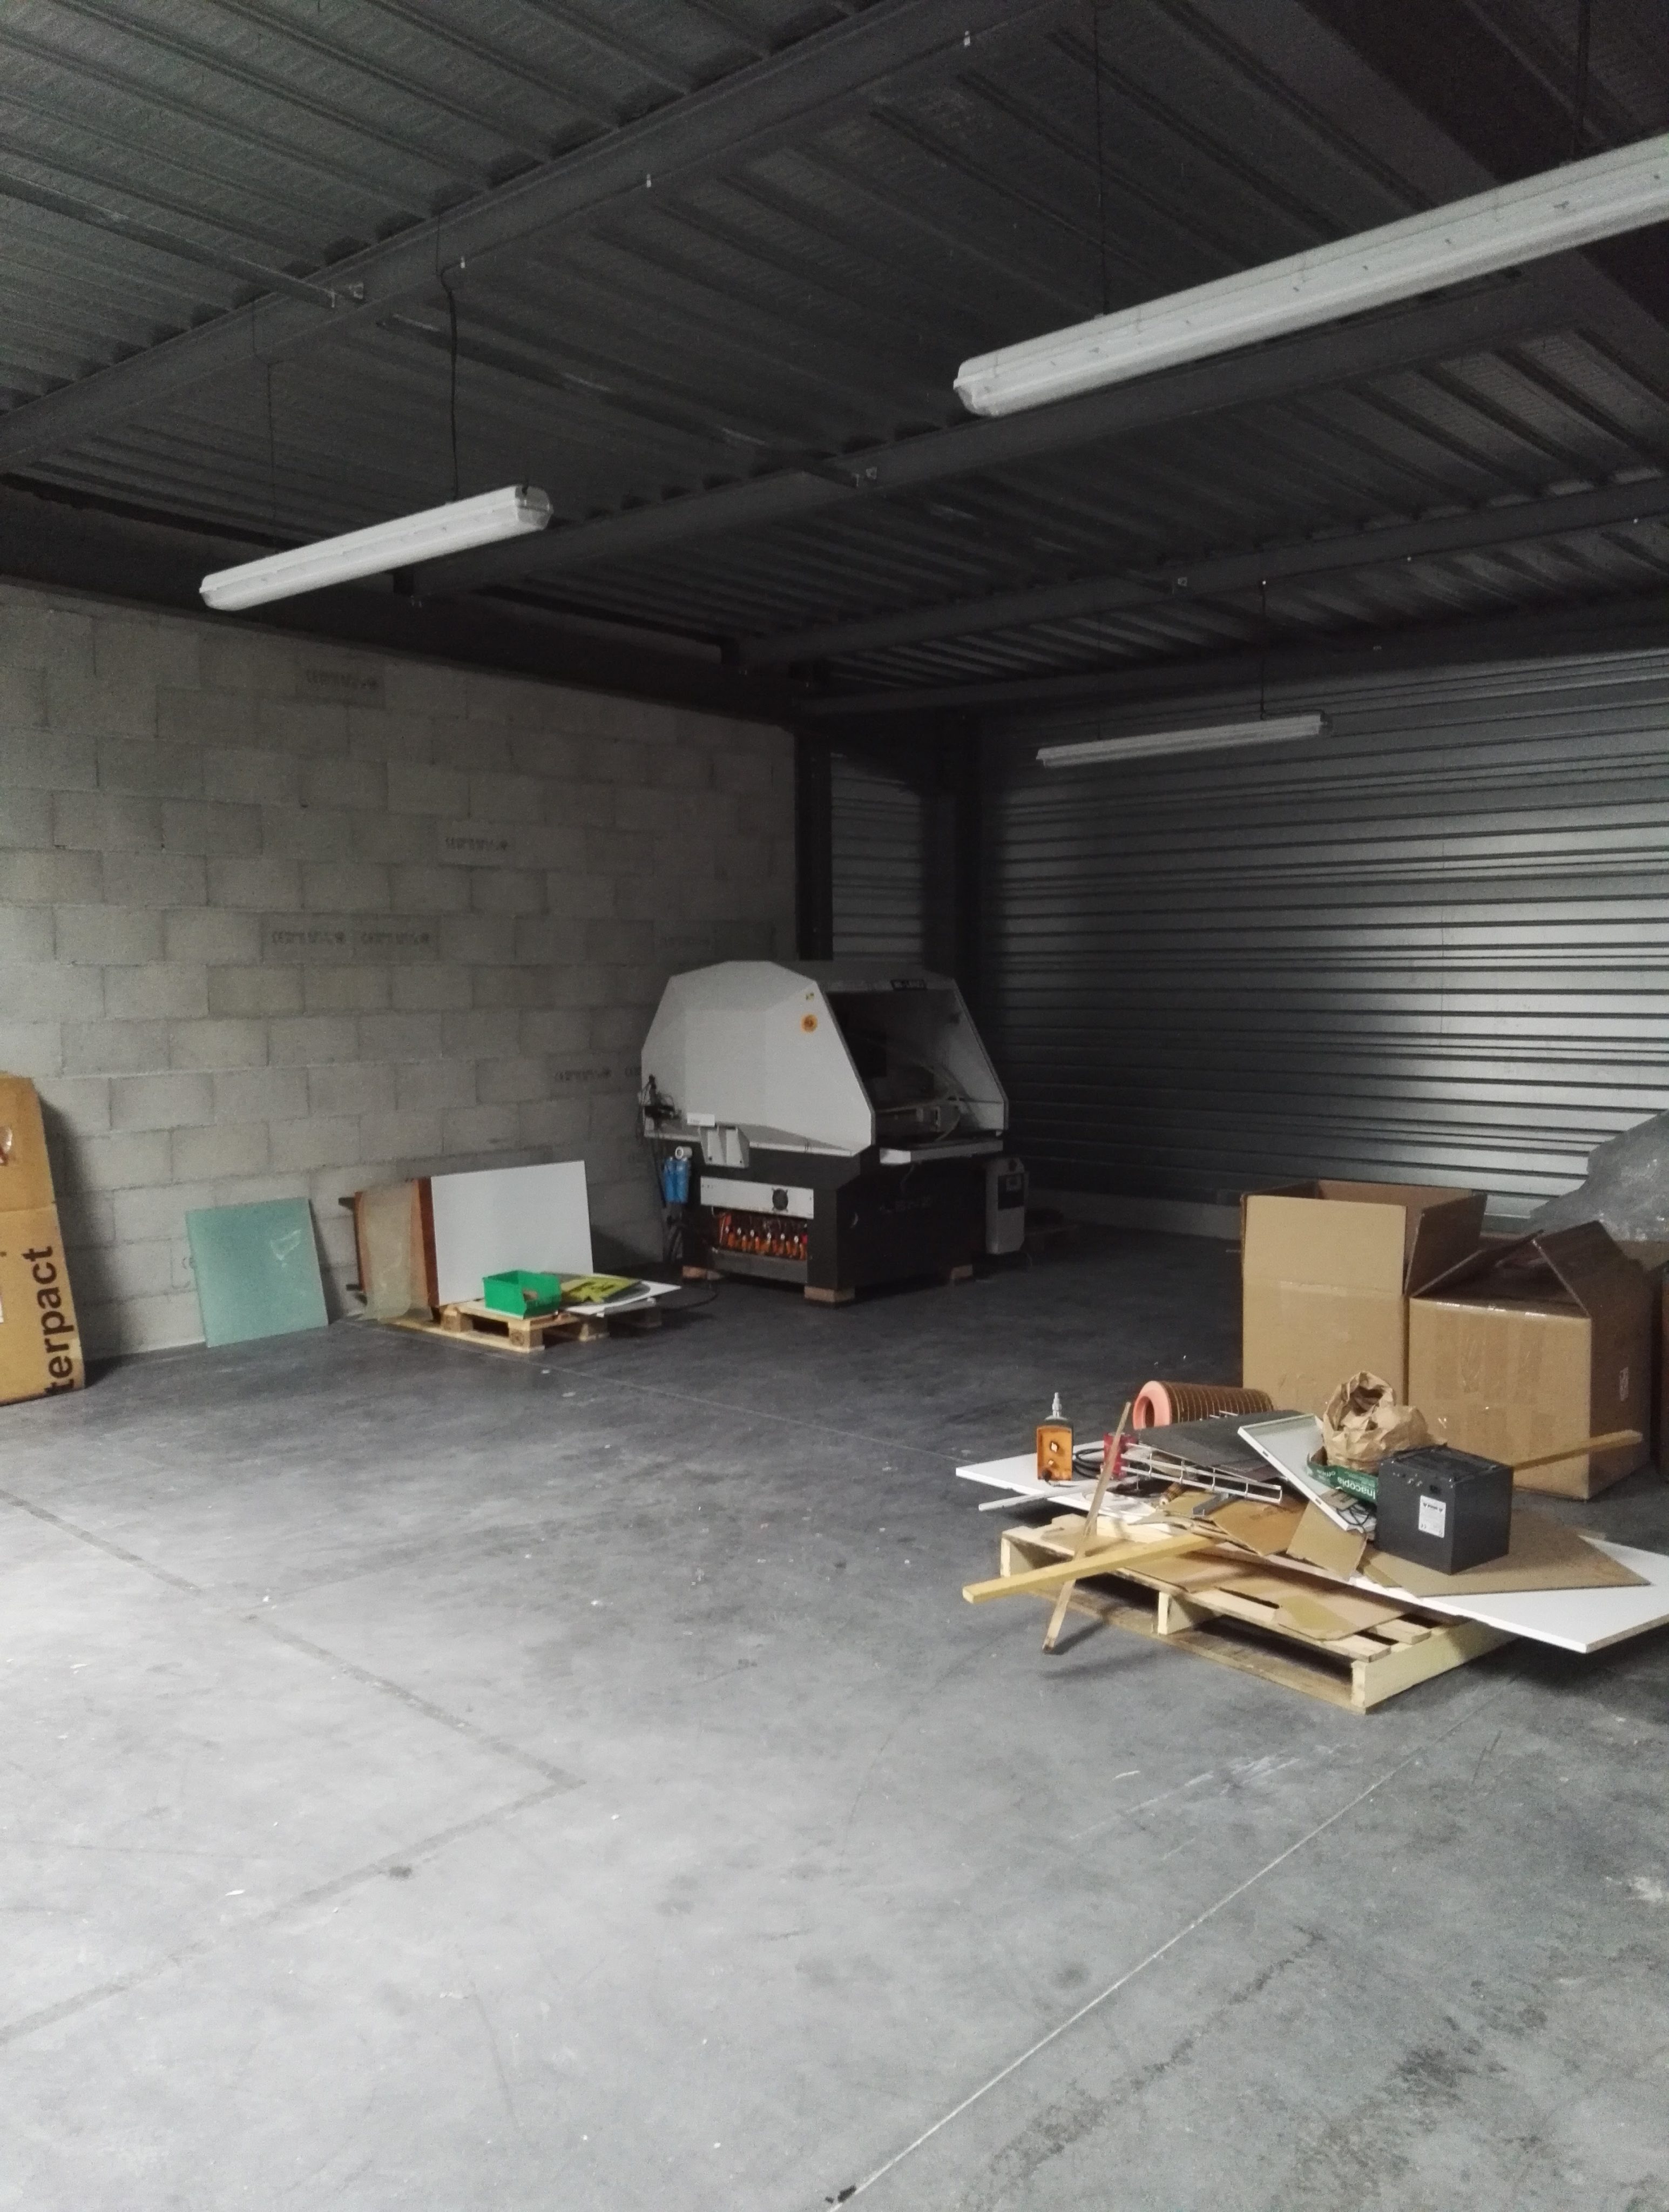
At the time, CPE-Lyon was supposed to recover it for the Galileo association but they dropped the ball and my dear acolyte Rafik and I ended up having a good time tearing it apart.
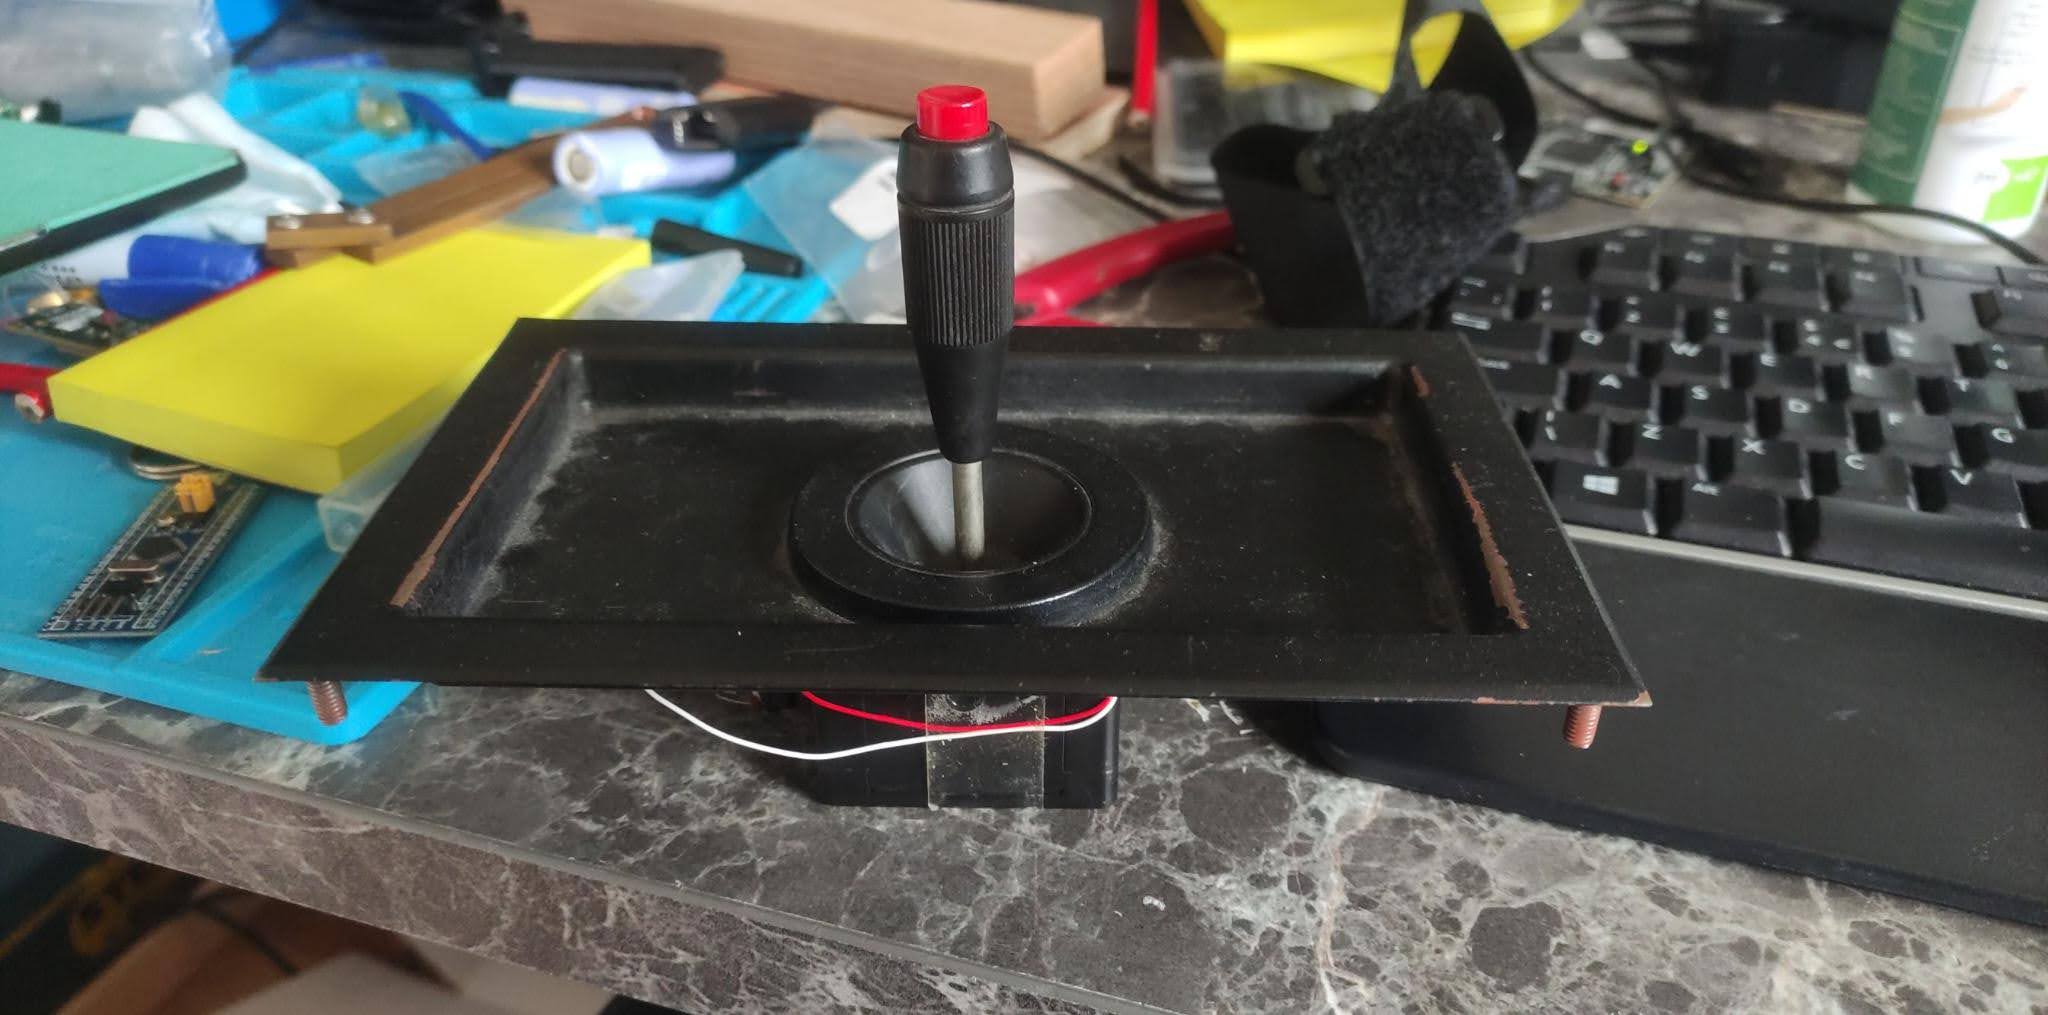
We recovered quite a few things which almost all ended up in the bottomless pit of Galileo, but I kept for myself that beautiful 2D joystick fully analog.
That joystick travelled with me across the ocean twice and went through multiple countries as part of my toolbox but I could never find a use for it.
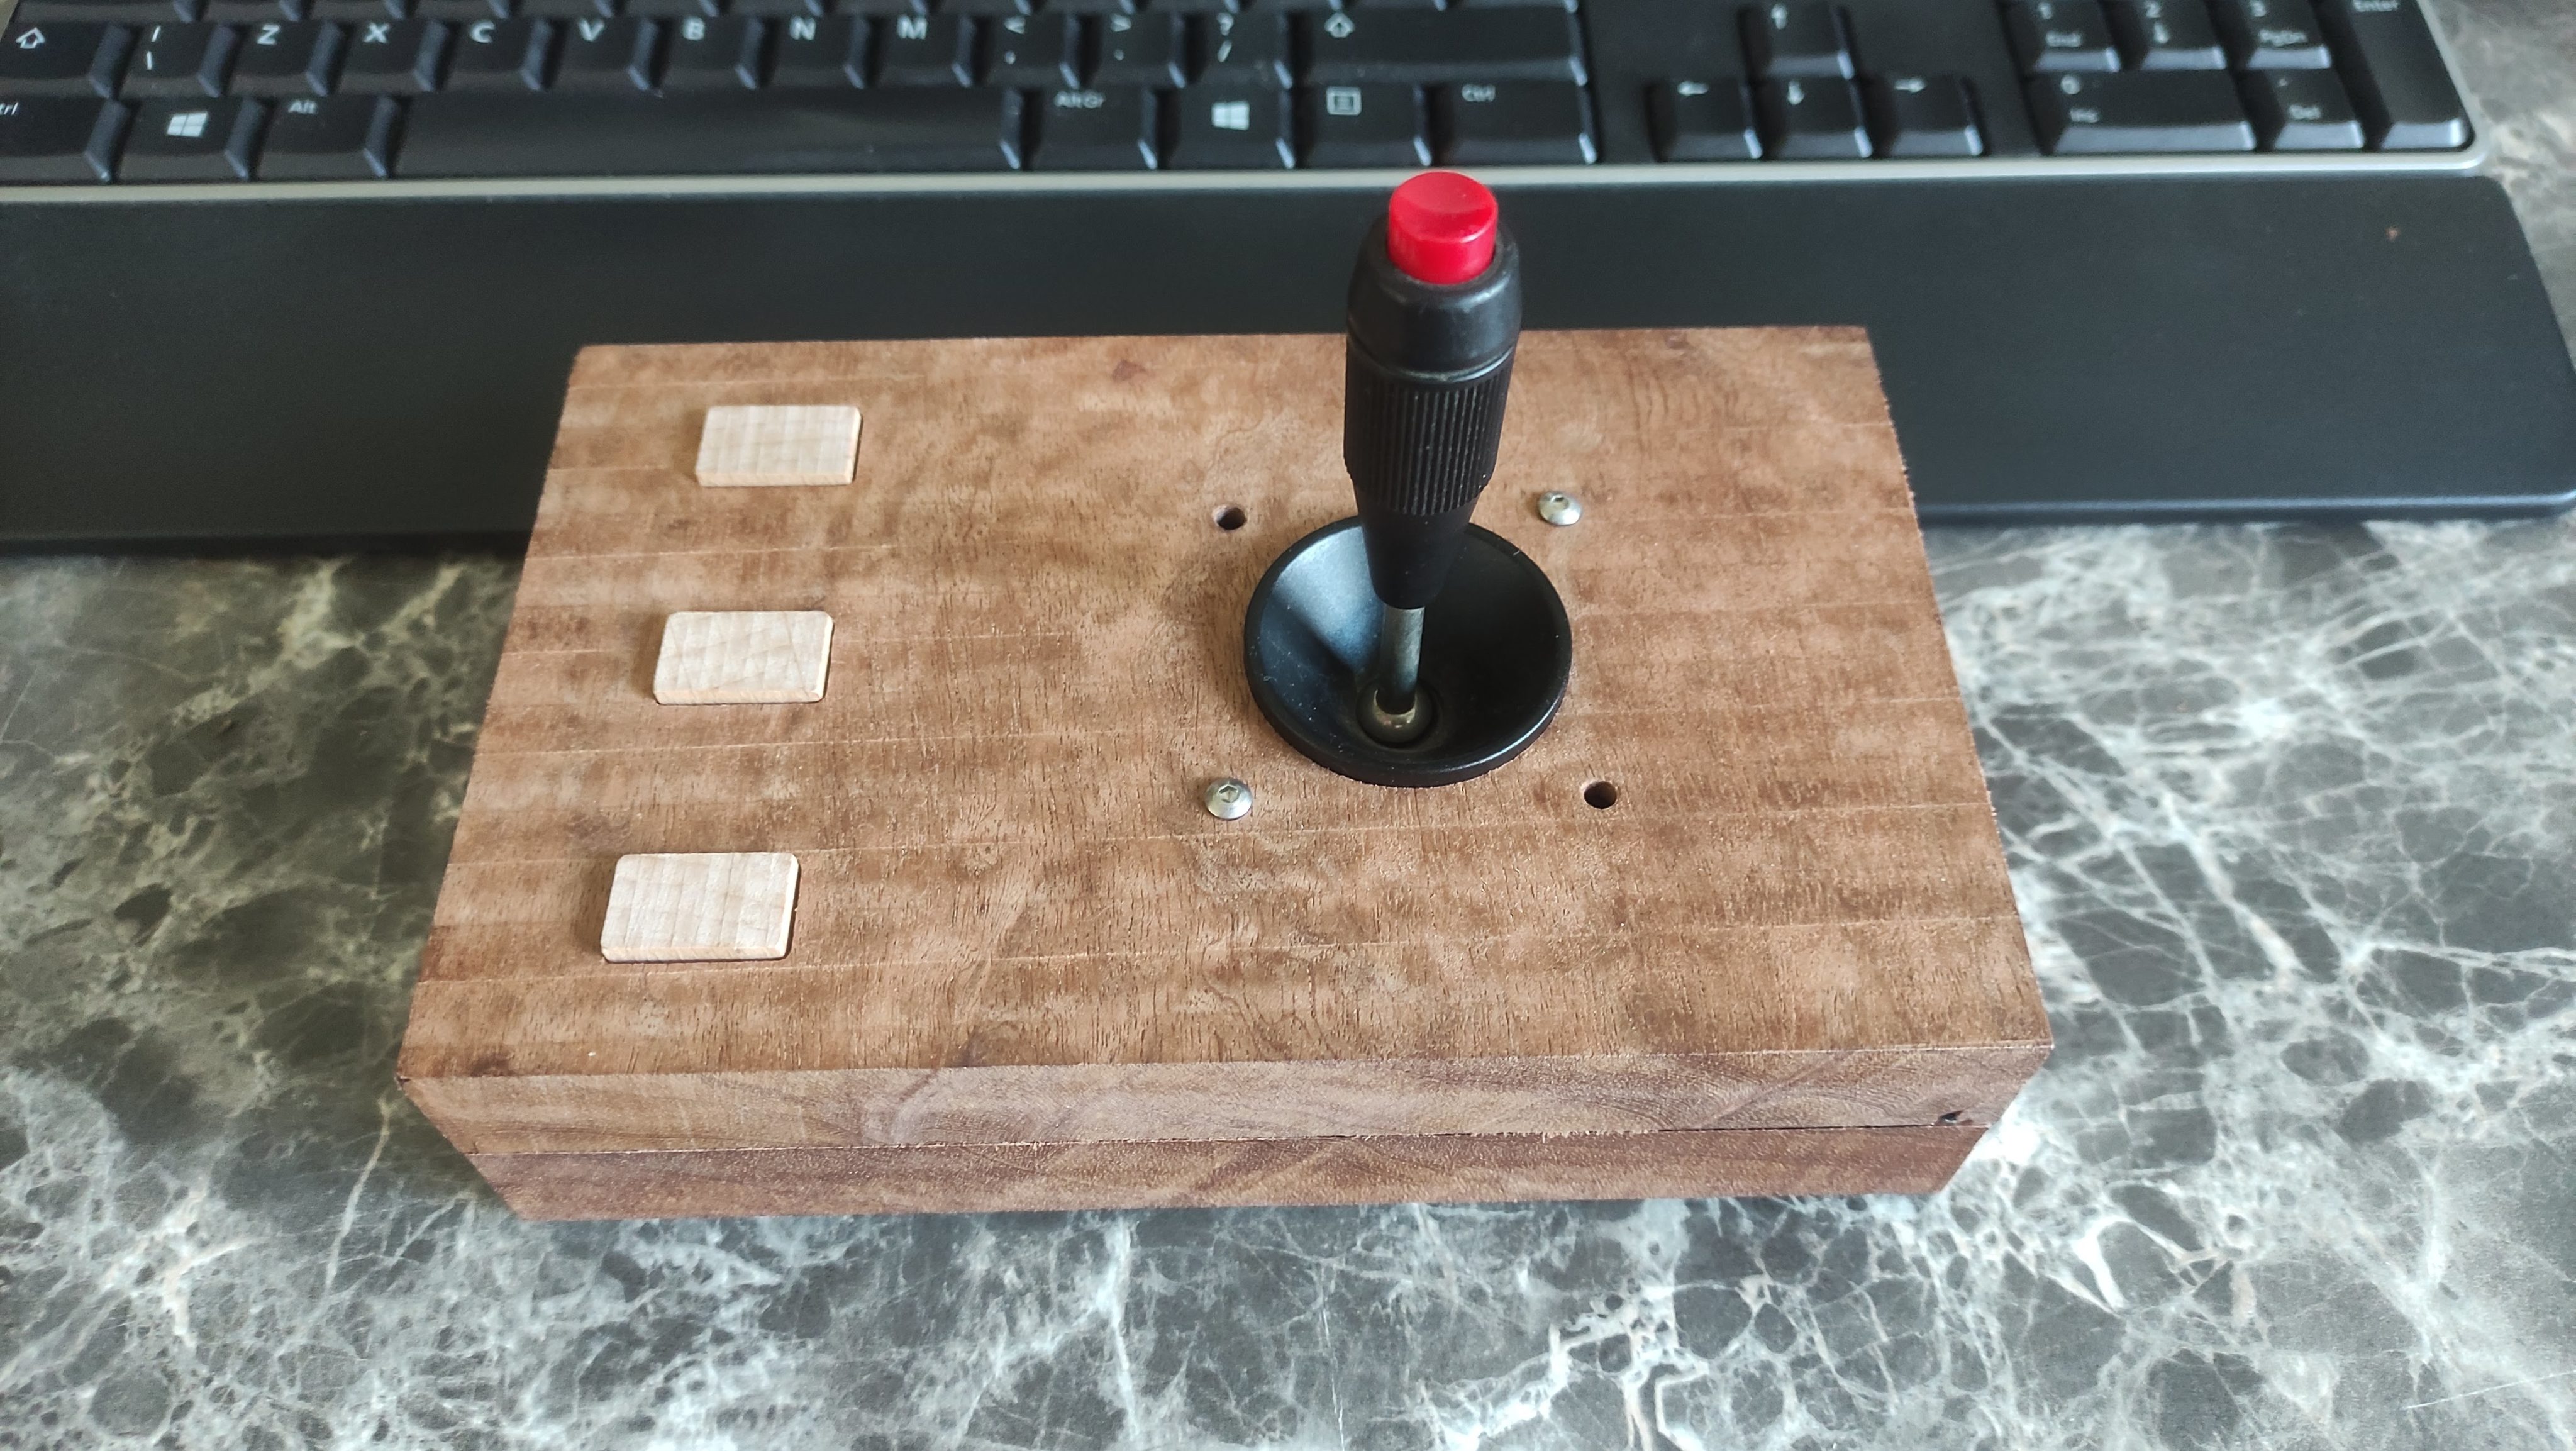
Tired of carrying it over, I finally decided to use it over a weekend – after all what is more useless than a not-used piece of equipment ? Another useless piece of equipment using that piece of equipment of course ! After all I am into 3D printing…
Mechanical Section
Before we get into the technical stuff, let’s consider how useful is a 2D joystick + 1 button… Not really right ?! In many applications you need more buttons than that, and sometimes, a second joystick. An obvious use case would be video games, but how many gamepad only have 1 button and 1 joystick ?! Think about it – how many game do you know are using so few buttons and axis ?
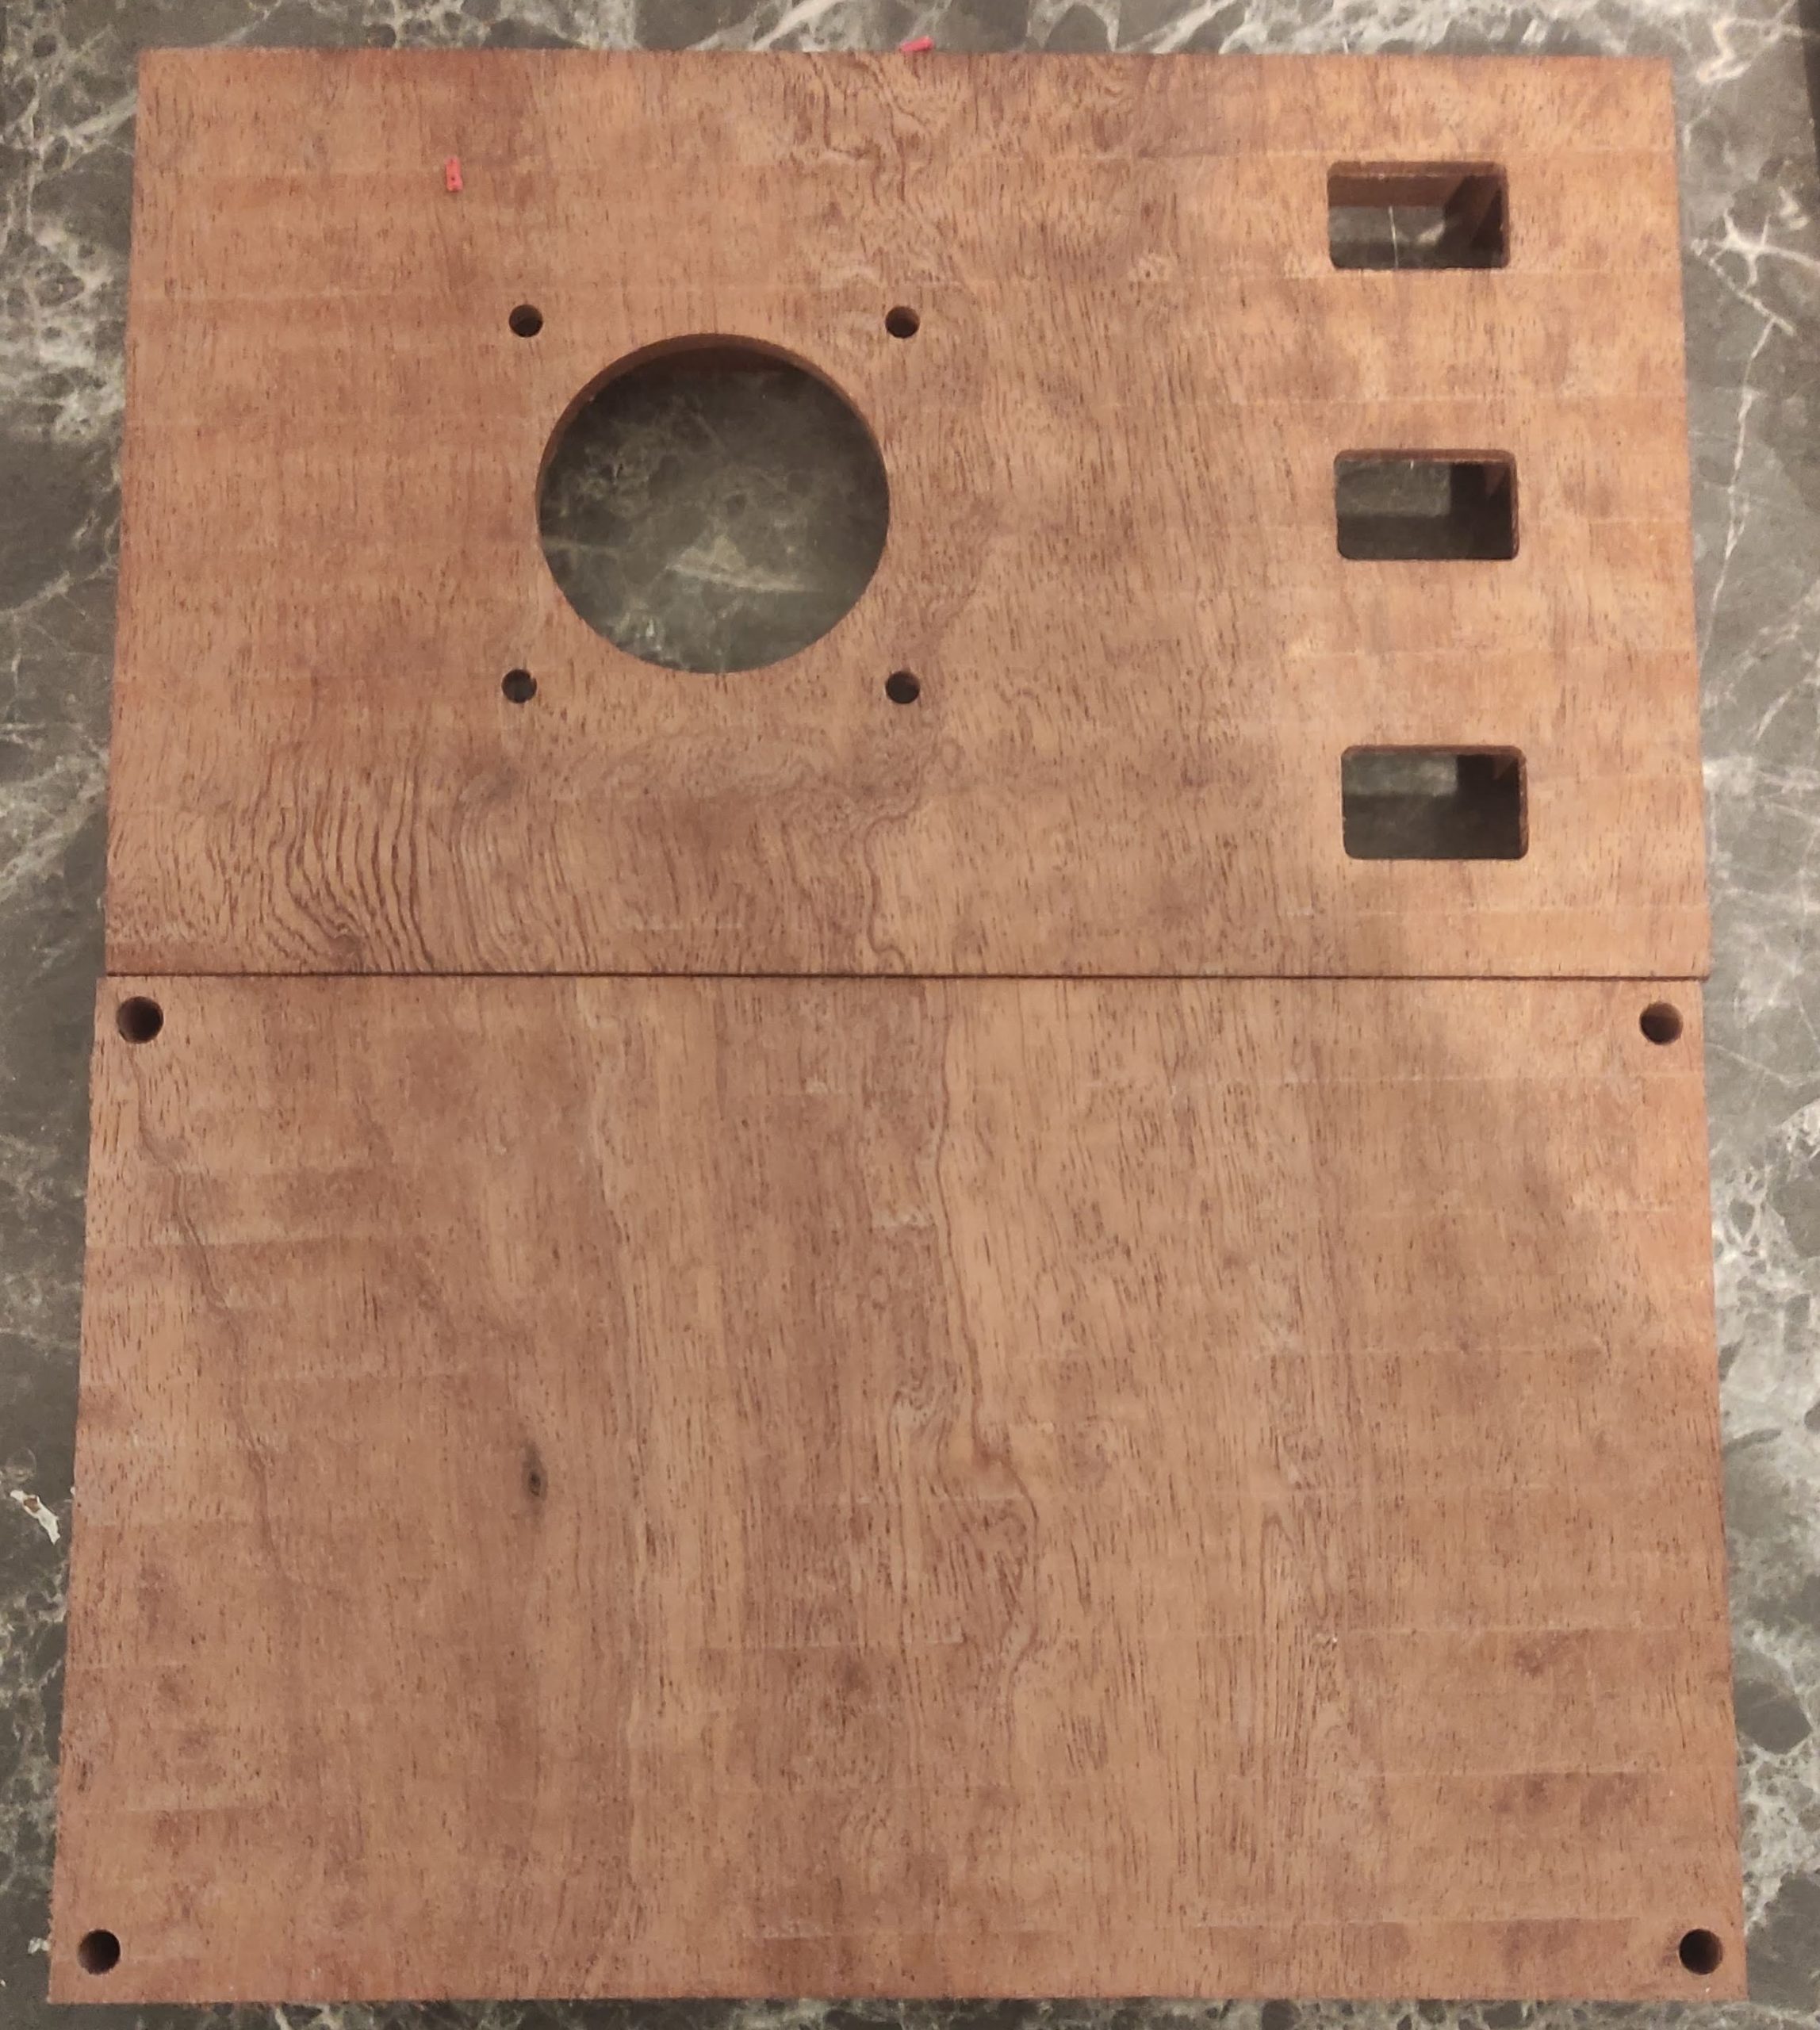
So I decided to build a 4 buttons – 2D axis Joystick so that i could have a bit more flexibility and maybe use it with my CNC. As I was into emptying my tool box, I decided to go with Endswitch for the extra buttons.
The plan was simple, get the white-ish buttons to only translate vertically and being bounced up by the endswitch itself.

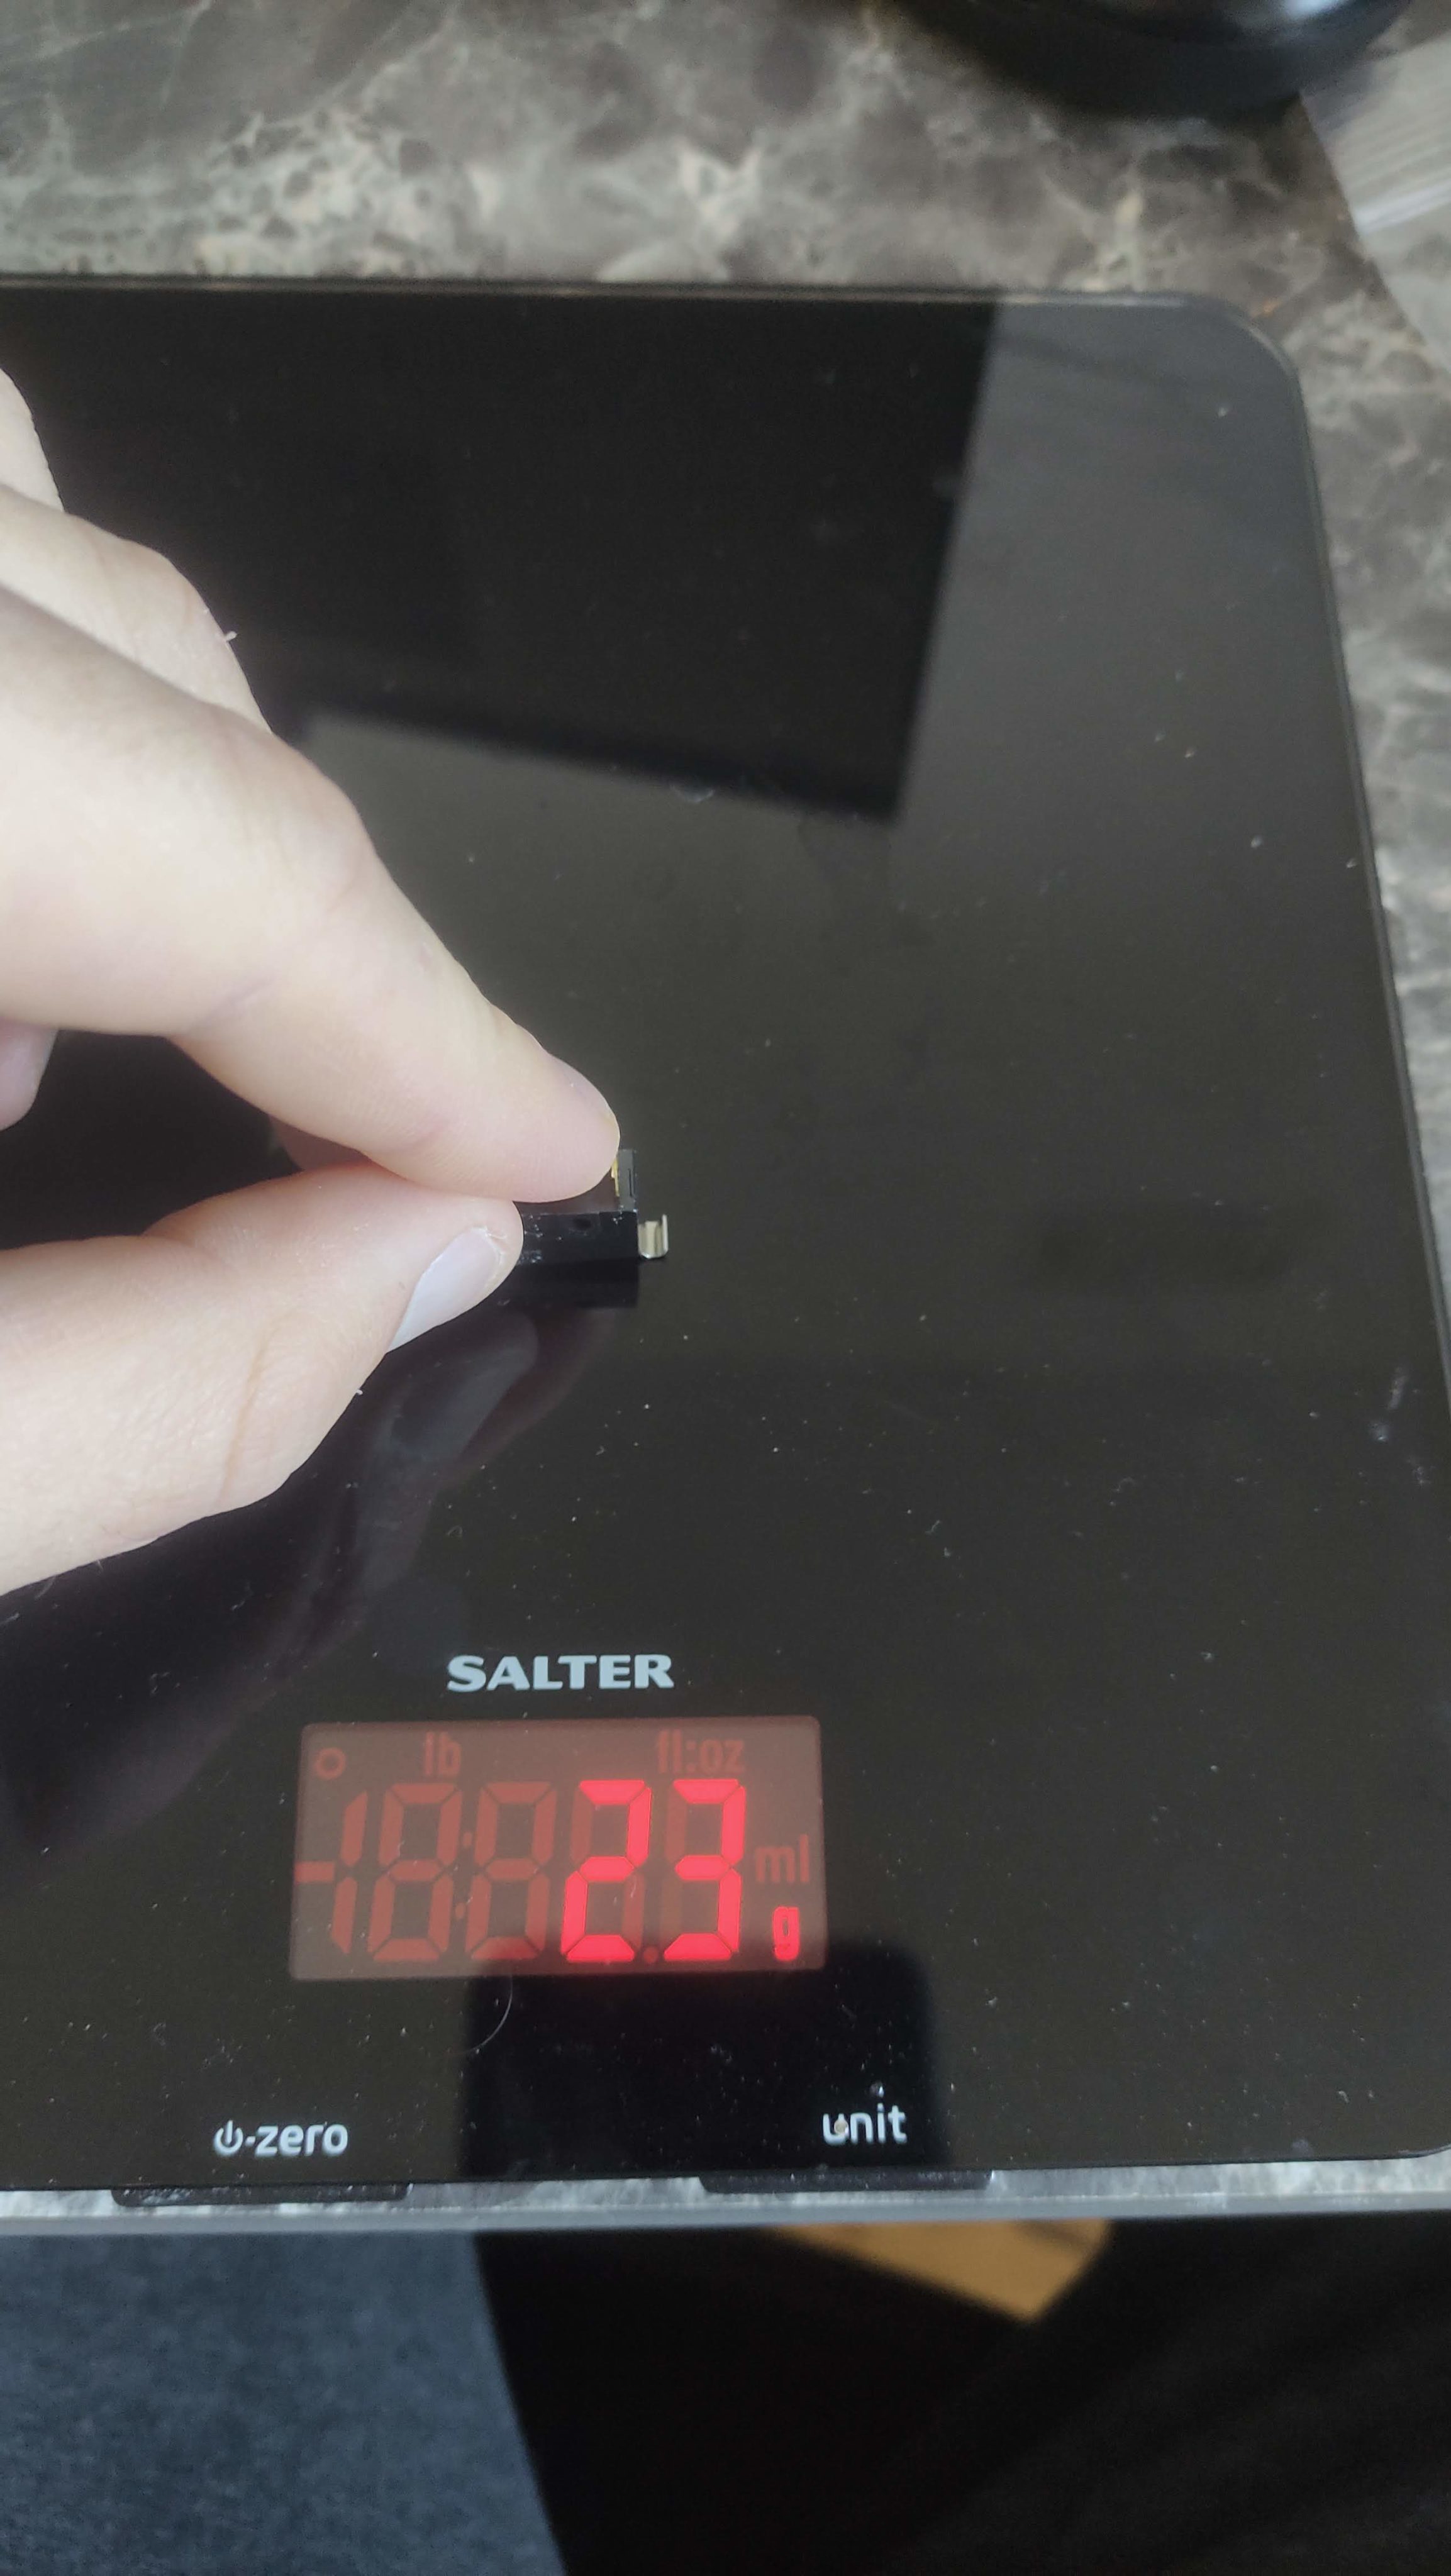
By measuring the force needed to trigger the endswitch, I could get an estimation of if this was going to work or not.
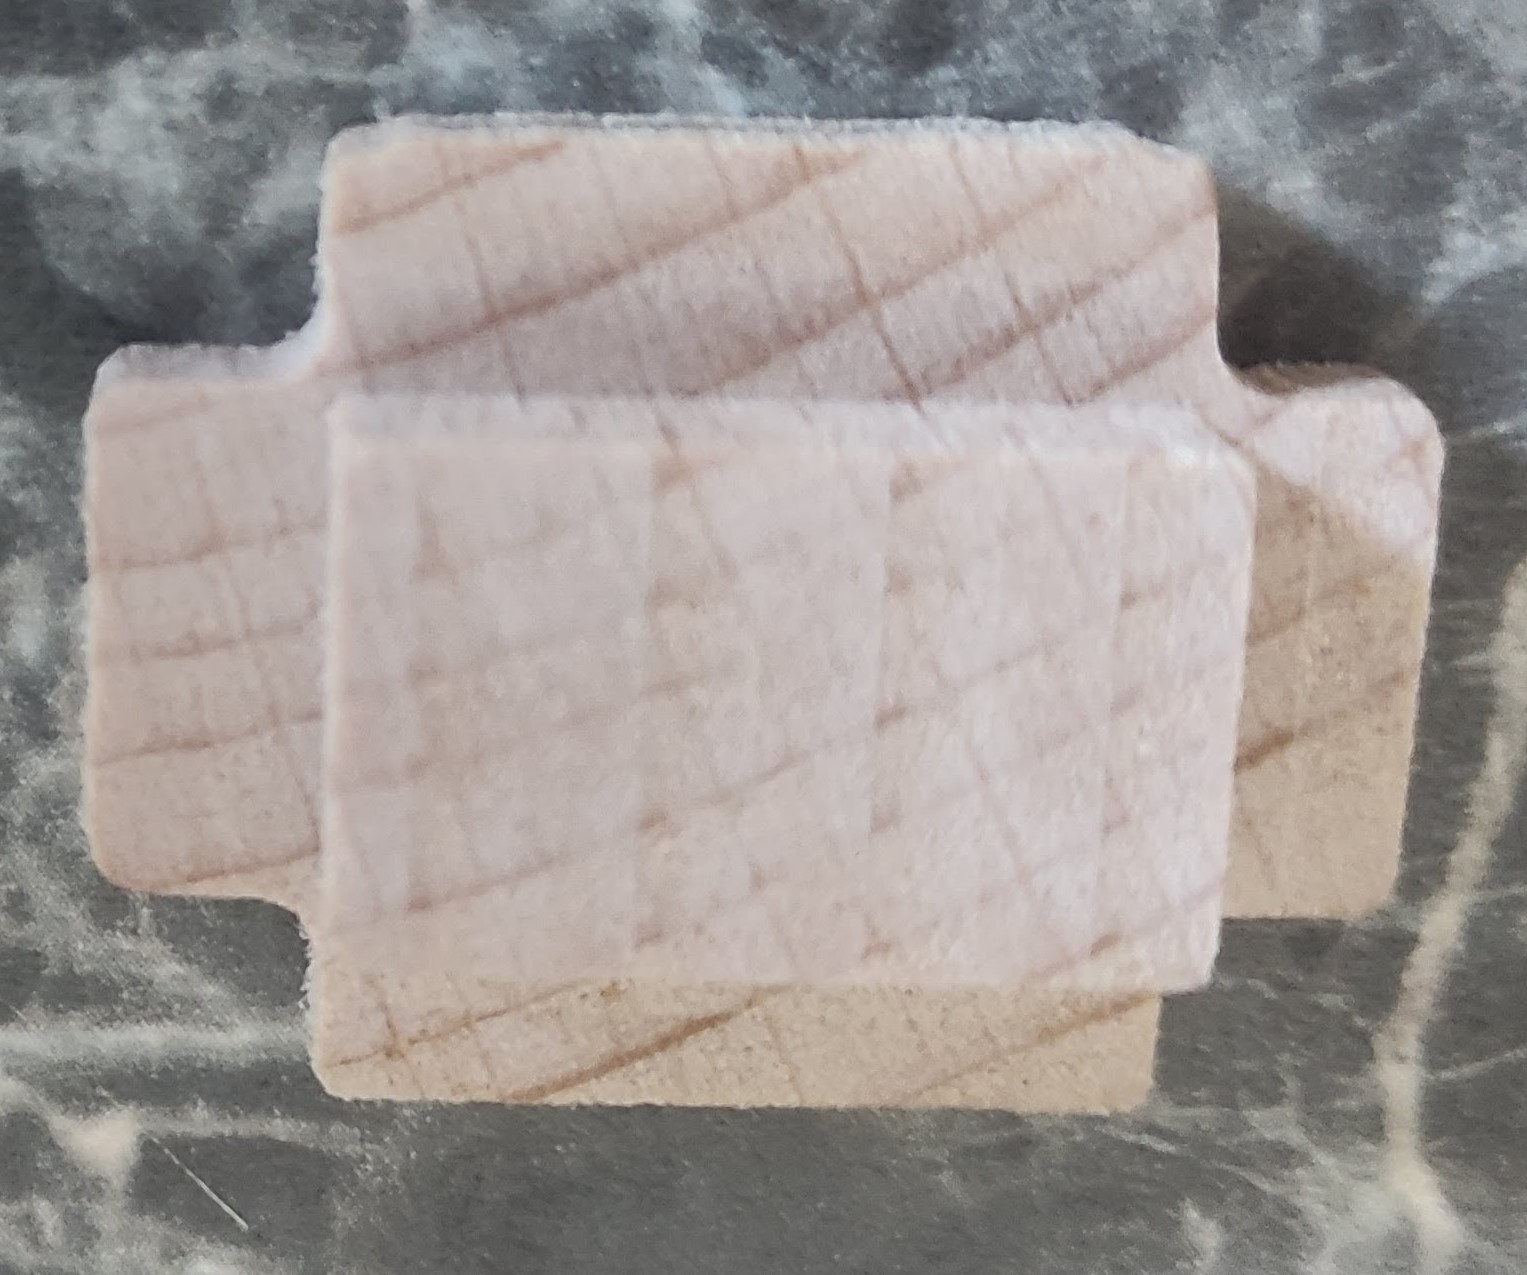
Using my new CNC machine I started milling some wood
My small buttons were weigthing 5g so I was confident that it would work !
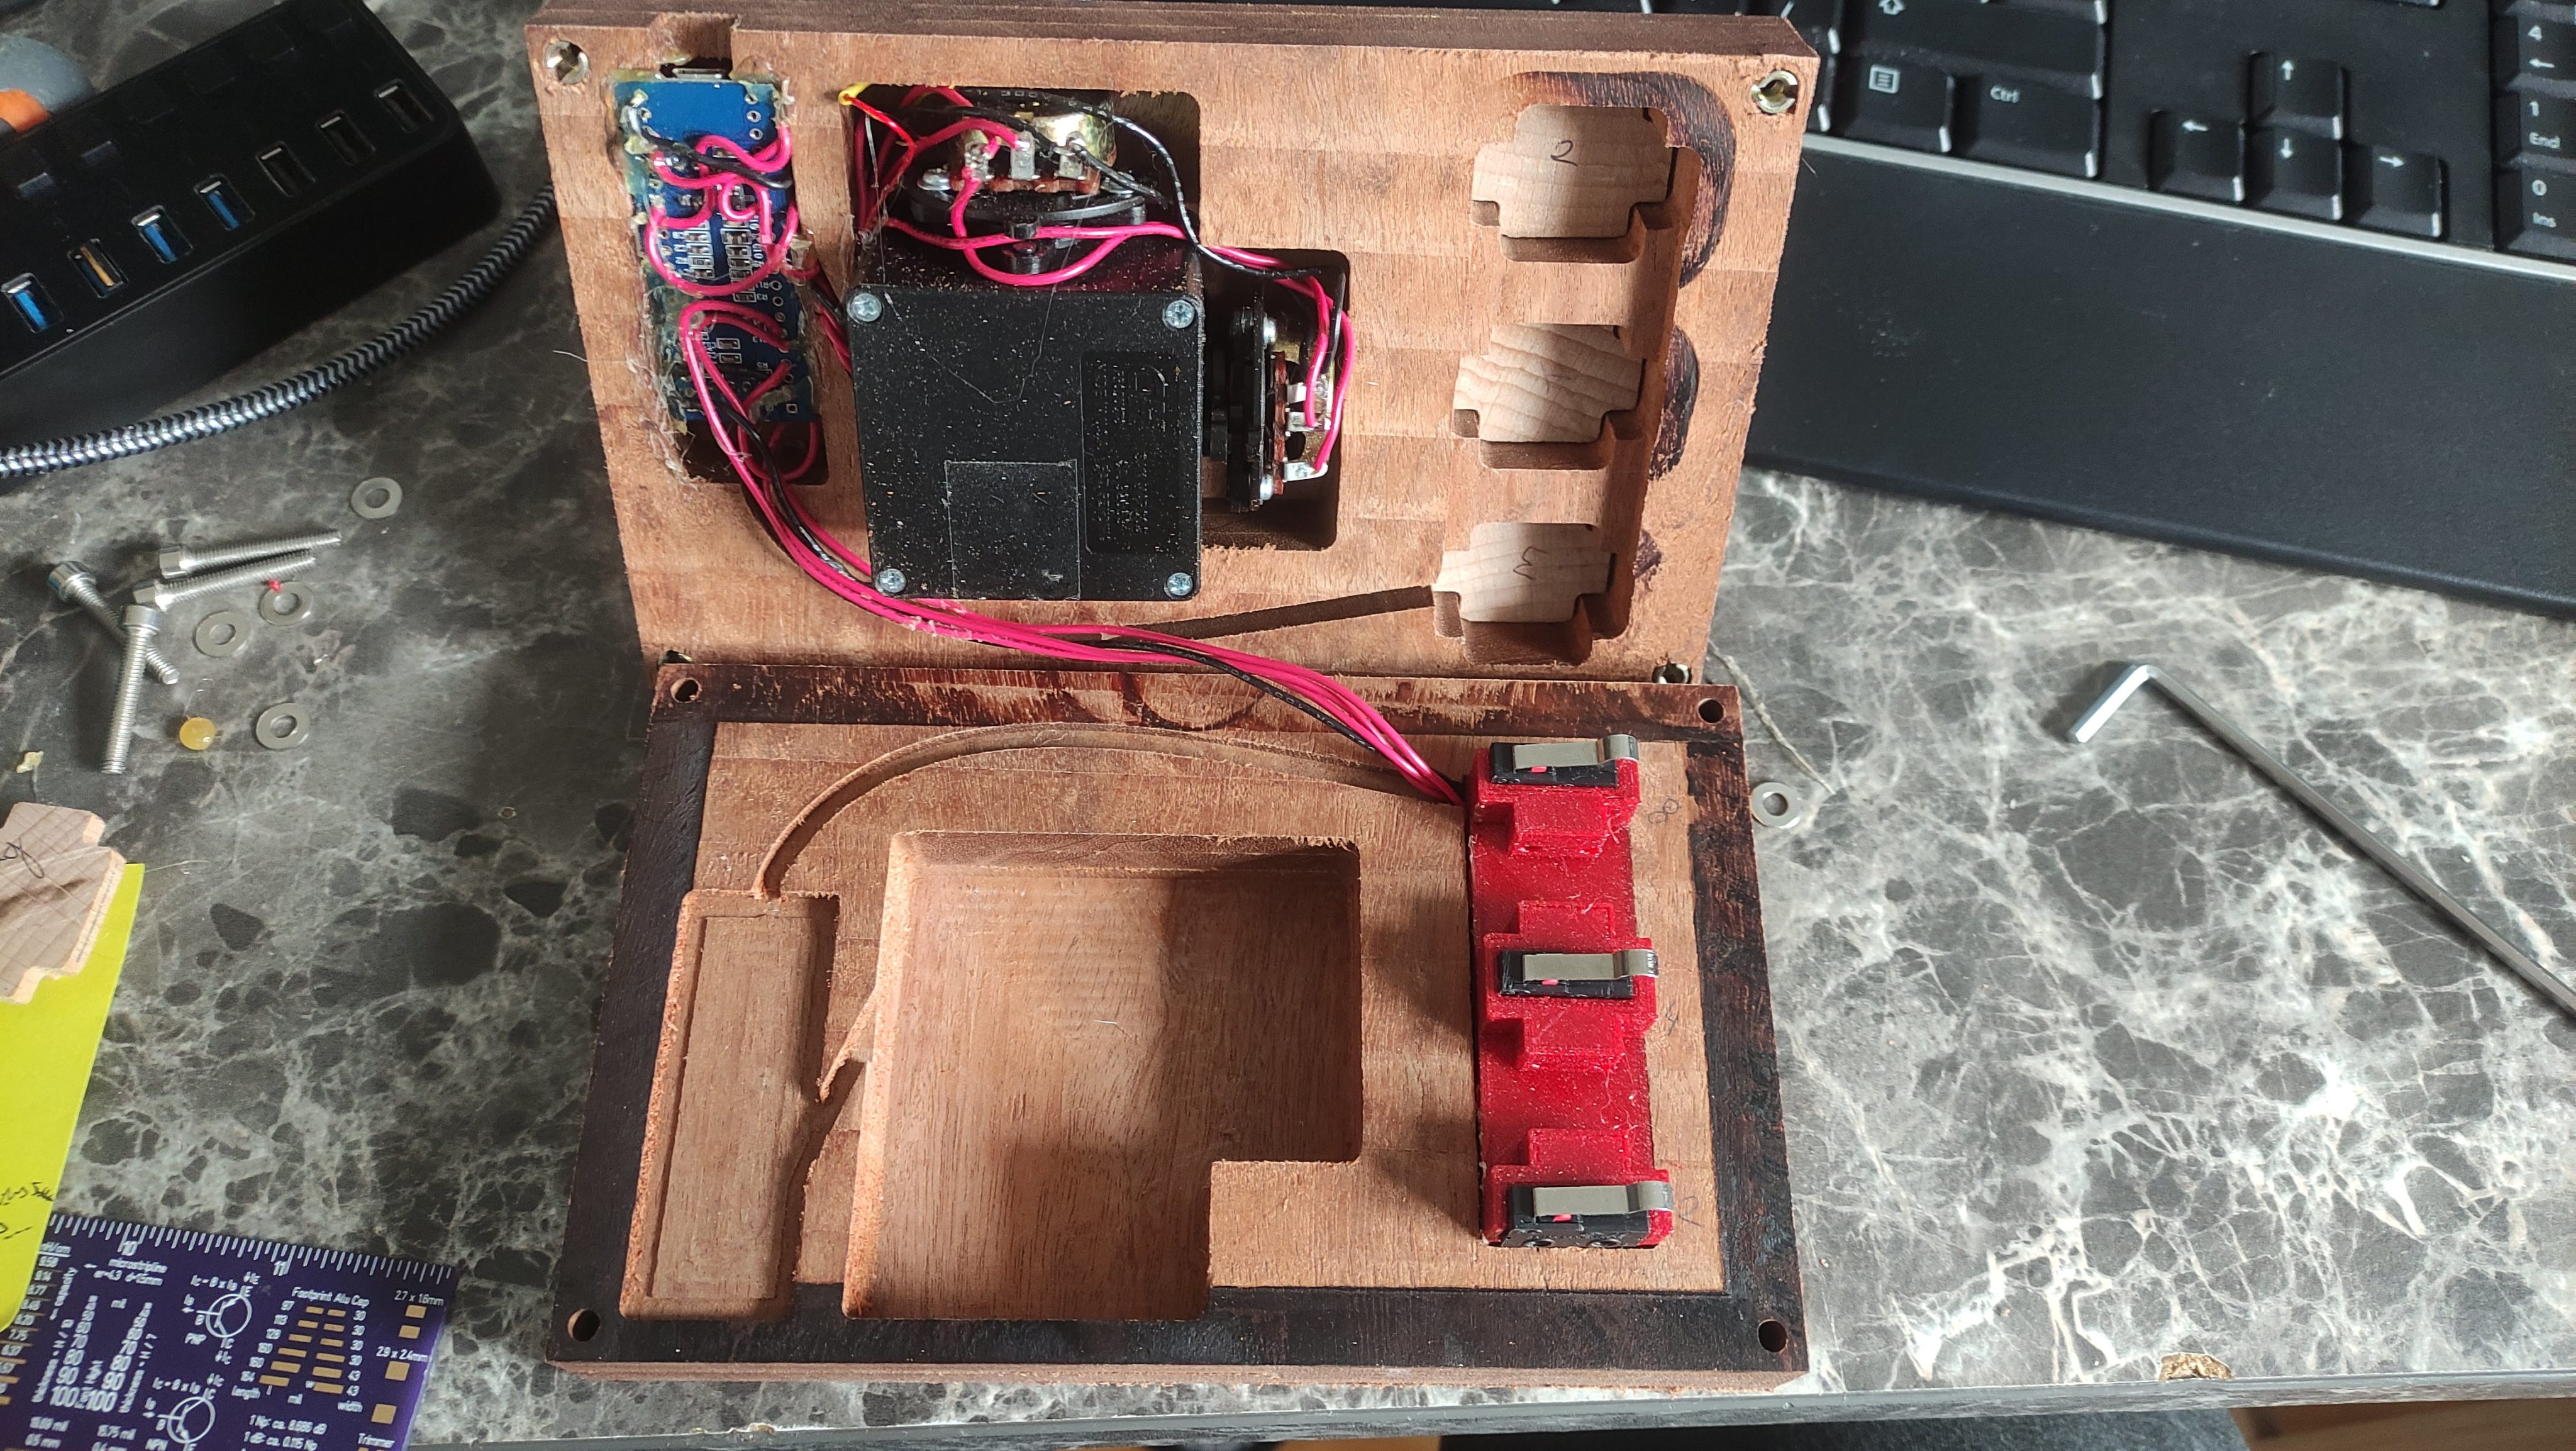
On the inside the plan was the following :
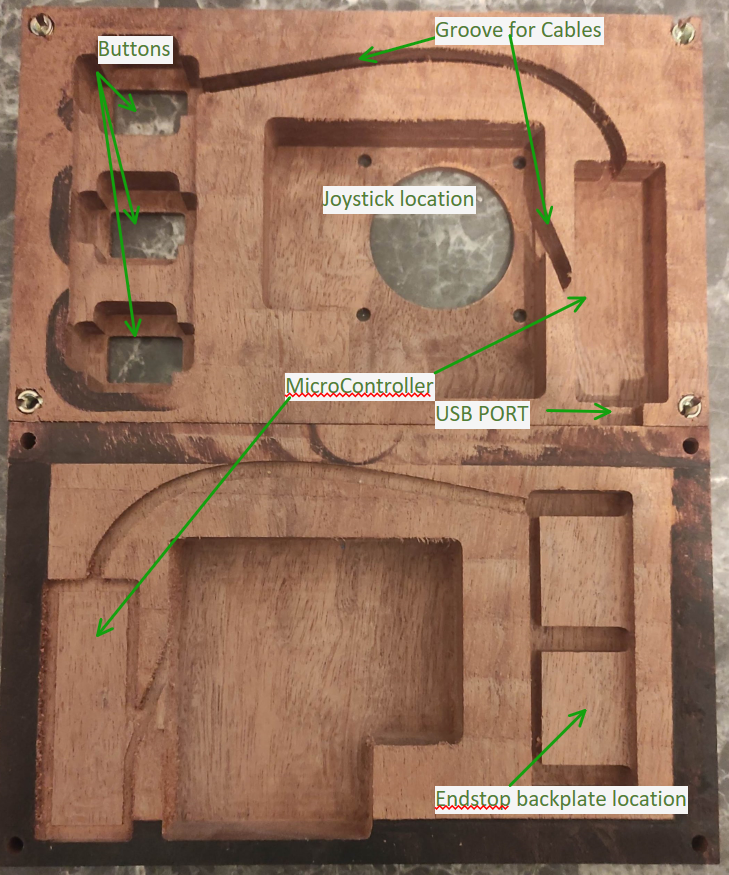
And it worked out more or less flawlessly
Electronic section
Regarding the electronics, I had few microcontrollers taking the dust. However there was one thing bothering me : regardless of my choice, how would the PC apprehend the information ? I could write a custom driver or an intermediate software to transcode the serial port to something else but that isn’t really efficient. I don’t want to be installing and maintaining software over the years for something so simple.
I started then searching on the web how normal periphals are being detected by computer automatically, could I make my joystick look like a mouse or a keyboard ?! That would solve my compatibility requirement.
And the answer is yes – and it is quite simple actually – you just have to integrate the USB protocol and act like a standard peripheral. (The keyword for that would be : USB human interface device class if you are interested)
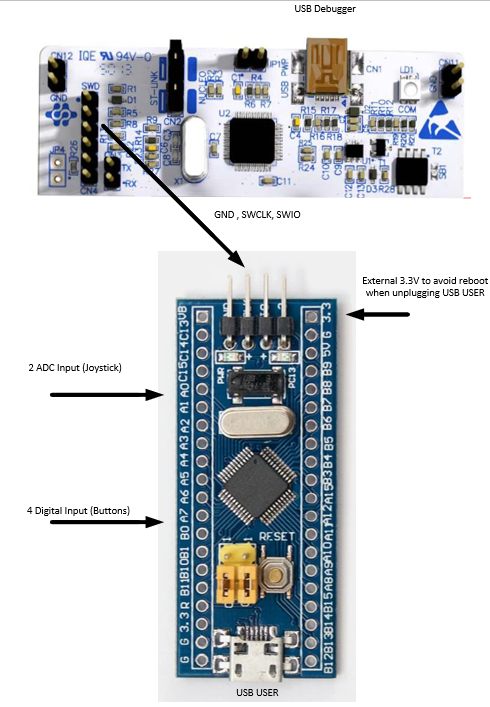
However after couples of hours of frustration with different microcontrollers, I realised that I was starting with the wrong foot. Typical evaluation board have the USB port connected to the debugger, and not for the processor you are using !
An example with the Nucleo-L412KB, the USB port is going to an STM32F103 which is acting as your ST-Link debugger but you will be downloading your code to the STM32L412KB which then has no USB port access.

This is why on many – more costly- evaluation boards you will find multiple USB port. But I wasn’t going to use a bigger evaluation board for such a simple task. After looking back at my toolbox, I found an old STM32F103 Bluepill from Xavier and it has no debugger at all !
To program this one, you will need an external debugger and for that I used a previously broken nucleo, this is how it goes :
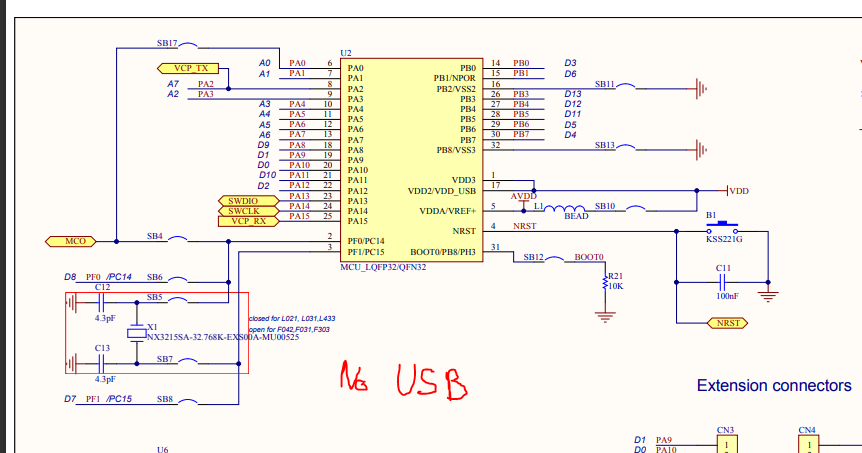
Regarding the inputs, the joystick is composed of two 10kOhm potentiometers and the buttons are using the integrated pull down of the STM32. When pressed down, the buttons are connecting the digital inputs to 3.3V.
Software Consideration
I had a pretty harsh time to get the USB protocol right. I still haven’t found a decent tool to help me debug what is going on but here are the different tools that I was using.
The Windows Peripheral List (Bluetooth and other devices settings), my worst nightmare was to see a “Driver error” message which would indicate that my HID descriptor was not correct.
Wireshark + USBPcap to investigate the USB communication and see if the USB report was incorrect. Note : The command on the official website was not working on my PC but the one below was.
USBPcapCMD.exe -A -d \\.\USBPcap3 -o - | "C:\Program Files\Wireshark\Wireshark.exe" -k -i -
The setup USB Game controller from windows which is surprisingly flexible and efficient!
This website to parse USB Descriptor – very handy to analyze what you find on the internet.
The software from ubs.org to build up descriptor – it is not very intuitive but it does the job once you understand a little bit the inner components.
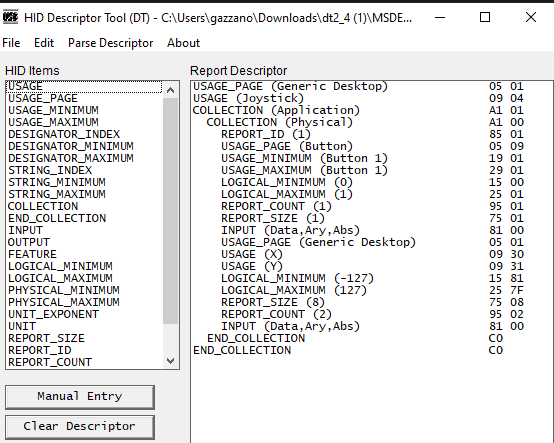
USB Descriptor Tool – your best friend to build custom descriptor and generate the corresponding hexa 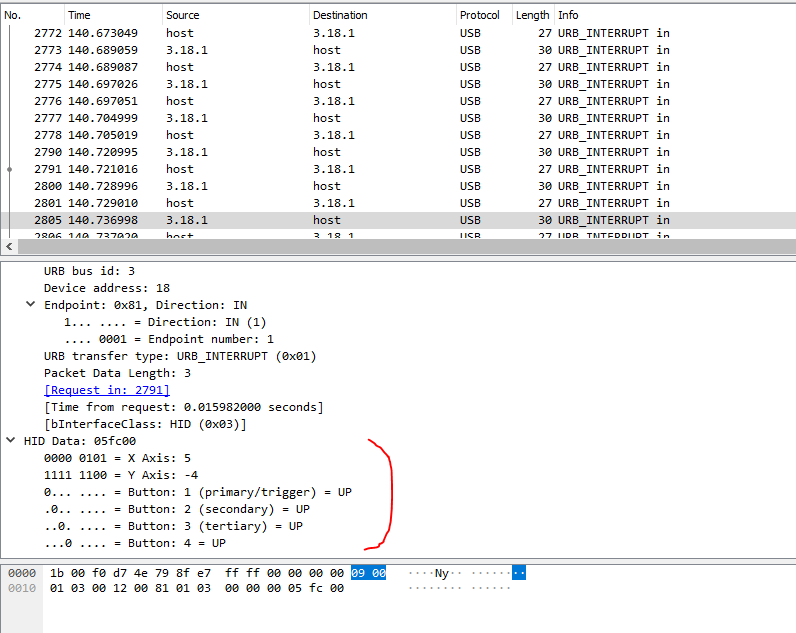
Standard package with Gamepad related content 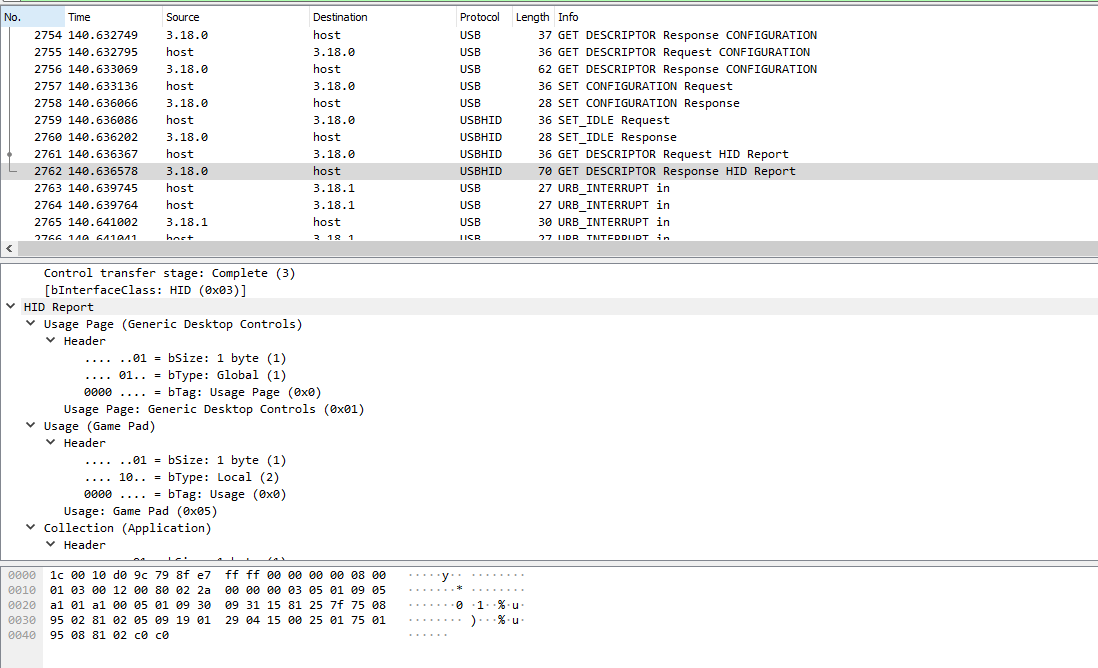
Gamepad descriptor 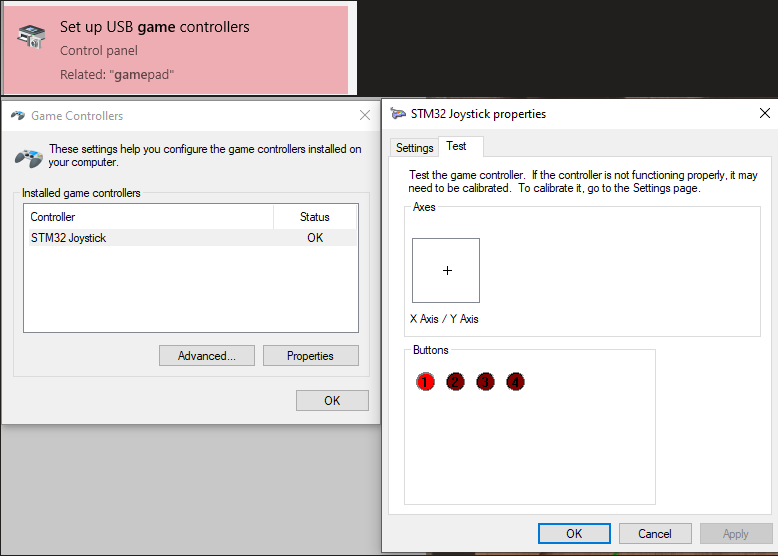
Gamepad tool from Windows – very handy for visualization 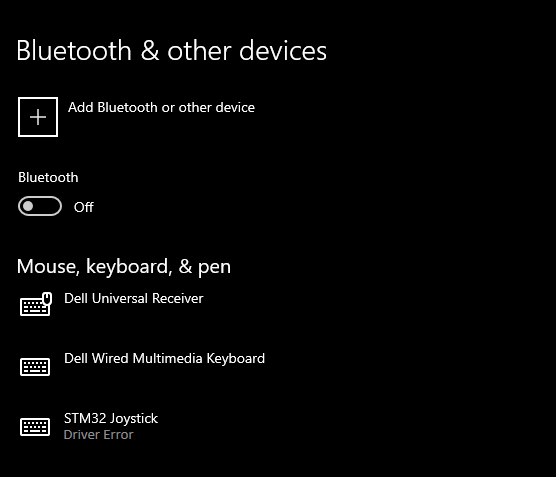
Windows complaining about the descriptor when incorrect
I am looking forward to people’s suggestions on better tool for the job.
Regarding the implementation in the ST environment it is actually quite simple. This is how I did it :
1- Use the auto generated code from cubemx
2- Replace the standard mouse descriptor by my own. This is happening in Middlewares\ST\STM32_USB_Device_Library\Class\HID\Src\usbd_hid.c and the variable HID_MOUSE_ReportDesc. /!\ Don’t forget to update the size of the array – it won’t throw an error at compilation but the USB communication will fail
3- Update the report and report size to what you want to use
4- Call the function USBD_HID_SendReport(&hUsbDeviceFS,&Report, SIZE); when you want to transmit a package
I haven’t found a way to update the USB driver files while staying compatible with the code auto generation (no User code is allowed in the middlewares files for some reason) so better be careful and regularly save your progression in a backup folder or Git.
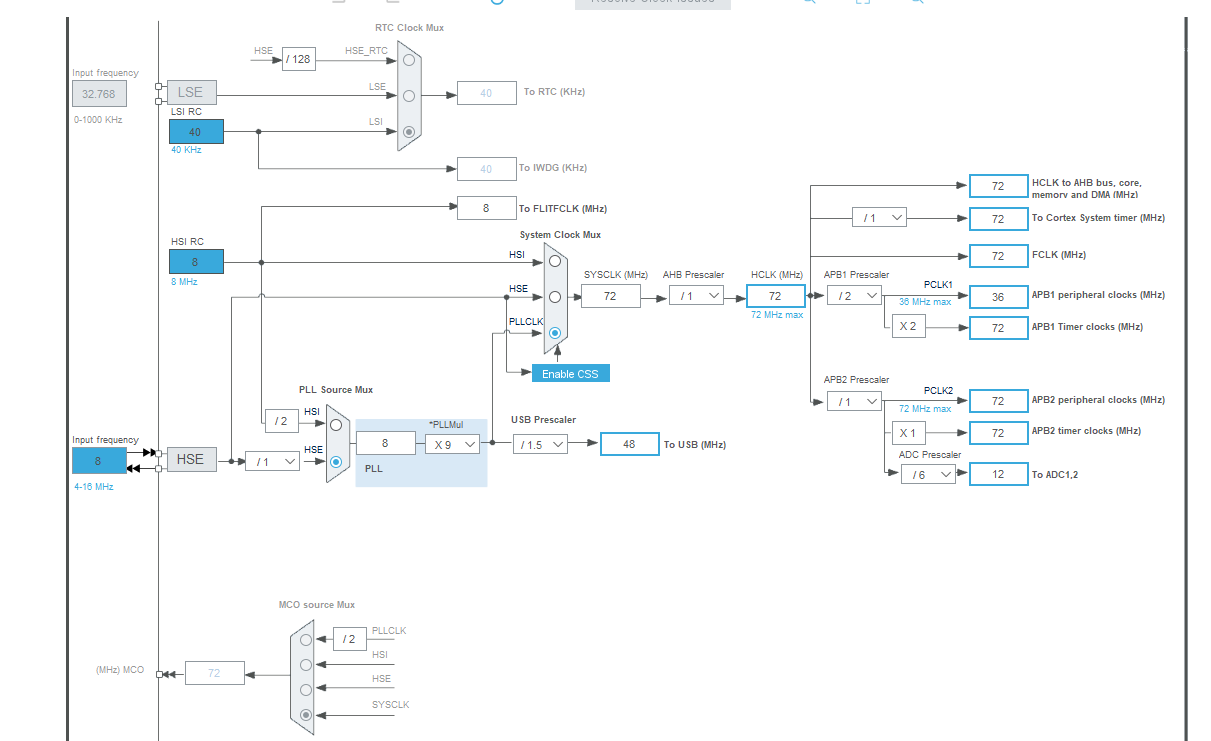
Clock Tree 
STM Pin Configuration
A good simple example can be found here.
My code is available on Github.
User Experience
To maximize the purpose of the hardware I decided to have 3 different configurations. I coded it such that they are available at any time without needing to re-download code in the microcontroller. The configurations are selected at startup (press a button while plugging the USB).
1- Acting as a Joystick (default)

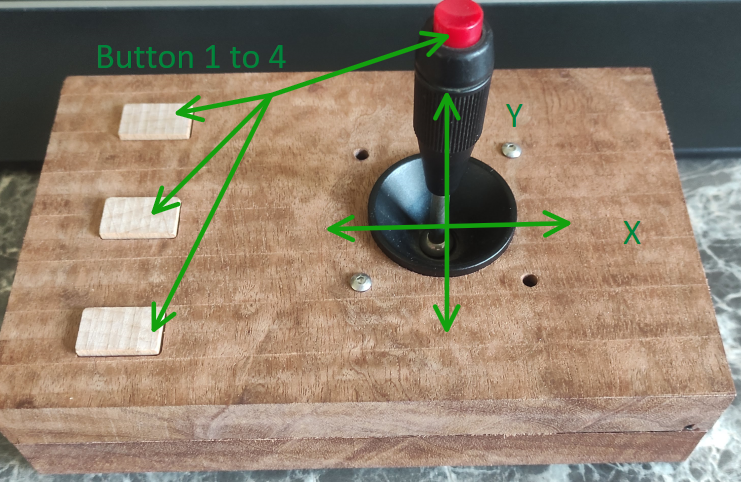
Descriptor :
                0x05, 0x01,                    // USAGE_PAGE (Generic Desktop)
		0x09, 0x05,                    // USAGE (Game Pad)
		0xa1, 0x01,                    // COLLECTION (Application)
		0xa1, 0x00,                    //   COLLECTION (Physical)
		0x05, 0x01,                    //     USAGE_PAGE (Generic Desktop)
		0x09, 0x30,                    //     USAGE (X)
		0x09, 0x31,                    //     USAGE (Y)
		0x15, 0x81,                    //     LOGICAL_MINIMUM (-127)
		0x25, 0x7f,                    //     LOGICAL_MAXIMUM (127)
		0x75, 0x08,                    //     REPORT_SIZE (8)
		0x95, 0x02,                    //     REPORT_COUNT (2)
		0x81, 0x02,                    //     INPUT (Data,Var,Abs)
		0x05, 0x09,                    //     USAGE_PAGE (Button)
		0x19, 0x01,                    //     USAGE_MINIMUM (Button 1)
		0x29, 0x04,                    //     USAGE_MAXIMUM (Button 4)
		0x15, 0x00,                    //     LOGICAL_MINIMUM (0)
		0x25, 0x01,                    //     LOGICAL_MAXIMUM (1)
		0x75, 0x01,                    //     REPORT_SIZE (8)
		0x95, 0x08,                    //     REPORT_COUNT (1)
		0x81, 0x02,                    //     INPUT (Data,Var,Abs)
		0xc0,                          //     END_COLLECTION
		0xc0                           // END_COLLECTION
2- Acting as a Mouse (Press button 1 at startup to be detected as a Mouse)

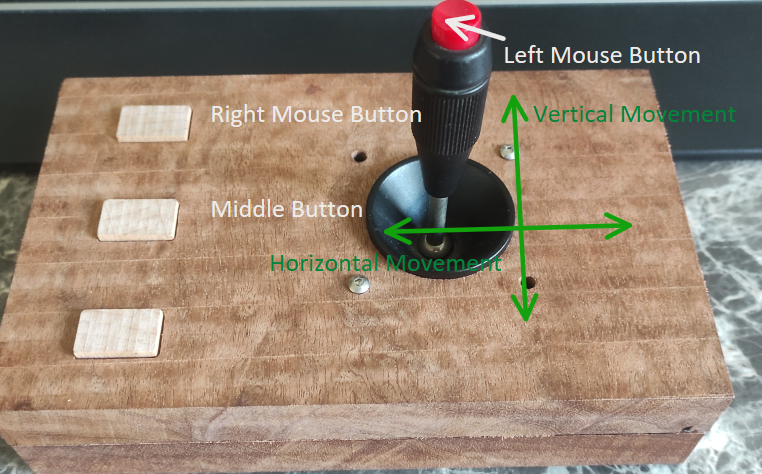
Descriptor:
                0x05, 0x01,        // Usage Page (Generic Desktop Ctrls)
		0x09, 0x02,        // Usage (Mouse)
		0xA1, 0x01,        // Collection (Application)
		0x09, 0x01,        //   Usage (Pointer)
		0xA1, 0x00,        //   Collection (Physical)
		0x05, 0x09,        //     Usage Page (Button)
		0x19, 0x01,        //     Usage Minimum (0x01)
		0x29, 0x03,        //     Usage Maximum (0x03)
		0x15, 0x00,        //     Logical Minimum (0)
		0x25, 0x01,        //     Logical Maximum (1)
		0x95, 0x03,        //     Report Count (3)
		0x75, 0x01,        //     Report Size (1)
		0x81, 0x02,        //     Input (Data,Var,Abs,No Wrap,Linear,Preferred State,No Null Position)
		0x95, 0x01,        //     Report Count (1)
		0x75, 0x05,        //     Report Size (5)
		0x81, 0x01,        //     Input (Const,Array,Abs,No Wrap,Linear,Preferred State,No Null Position)
		0x05, 0x01,        //     Usage Page (Generic Desktop Ctrls)
		0x09, 0x30,        //     Usage (X)
		0x09, 0x31,        //     Usage (Y)
		0x09, 0x38,        //     Usage (Wheel)
		0x15, 0x81,        //     Logical Minimum (-127)
		0x25, 0x7F,        //     Logical Maximum (127)
		0x75, 0x08,        //     Report Size (8)
		0x95, 0x03,        //     Report Count (3)
		0x81, 0x06,        //     Input (Data,Var,Rel,No Wrap,Linear,Preferred State,No Null Position)
		0xC0,              //   End Collection
		0x09, 0x3C,        //   Usage (Motion Wakeup)
		0x05, 0xFF,        //   Usage Page (Reserved 0xFF)
		0x09, 0x01,        //   Usage (0x01)
		0x15, 0x00,        //   Logical Minimum (0)
		0x25, 0x01,        //   Logical Maximum (1)
		0x75, 0x01,        //   Report Size (1)
		0x95, 0x02,        //   Report Count (2)
		0xB1, 0x22,        //   Feature (Data,Var,Abs,No Wrap,Linear,No Preferred State,No Null Position,Non-volatile)
		0x75, 0x06,        //   Report Size (6)
		0x95, 0x01,        //   Report Count (1)
		0xB1, 0x01,        //   Feature (Const,Array,Abs,No Wrap,Linear,Preferred State,No Null Position,Non-volatile)
		0xC0,              // End Collection
3- Acting as a simple keyboard mostly targetted for CNC control (Page UP/DOWN are used for the Z axis and Left Shift key for fast movement)

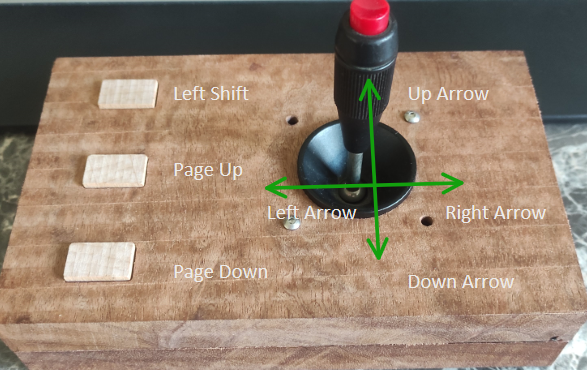
Descriptor :
            0x05, 0x01,                    // USAGE_PAGE (Generic Desktop)
	    0x09, 0x06,                    // USAGE (Keyboard)
	    0xa1, 0x01,                    // COLLECTION (Application)
	    0x05, 0x07,                    //   USAGE_PAGE (Keyboard)
	    0x19, 0xe0,                    //   USAGE_MINIMUM (Keyboard LeftControl)
	    0x29, 0xe7,                    //   USAGE_MAXIMUM (Keyboard Right GUI)
	    0x15, 0x00,                    //   LOGICAL_MINIMUM (0)
	    0x25, 0x01,                    //   LOGICAL_MAXIMUM (1)
	    0x75, 0x01,                    //   REPORT_SIZE (1)
	    0x95, 0x08,                    //   REPORT_COUNT (8)
	    0x81, 0x02,                    //   INPUT (Data,Var,Abs)
	    0x95, 0x01,                    //   REPORT_COUNT (1)
	    0x75, 0x08,                    //   REPORT_SIZE (8)
	    0x81, 0x03,                    //   INPUT (Cnst,Var,Abs)
	    0x95, 0x05,                    //   REPORT_COUNT (5)
	    0x75, 0x01,                    //   REPORT_SIZE (1)
	    0x05, 0x08,                    //   USAGE_PAGE (LEDs)
	    0x19, 0x01,                    //   USAGE_MINIMUM (Num Lock)
	    0x29, 0x05,                    //   USAGE_MAXIMUM (Kana)
	    0x91, 0x02,                    //   OUTPUT (Data,Var,Abs)
	    0x95, 0x01,                    //   REPORT_COUNT (1)
	    0x75, 0x03,                    //   REPORT_SIZE (3)
	    0x91, 0x03,                    //   OUTPUT (Cnst,Var,Abs)
	    0x95, 0x06,                    //   REPORT_COUNT (6)
	    0x75, 0x08,                    //   REPORT_SIZE (8)
	    0x15, 0x00,                    //   LOGICAL_MINIMUM (0)
	    0x25, 0x65,                    //   LOGICAL_MAXIMUM (101)
	    0x05, 0x07,                    //   USAGE_PAGE (Keyboard)
	    0x19, 0x00,                    //   USAGE_MINIMUM (Reserved (no event indicated))
	    0x29, 0x65,                    //   USAGE_MAXIMUM (Keyboard Application)
	    0x81, 0x00,                    //   INPUT (Data,Ary,Abs)
	    0xc0                           // END_COLLECTION
Result
You might recall that at the beginning of that post, I mentioned that I didn’t want to rewrite any driver or software. That proved to be successful as after finishing this project on my windows laptop, I decided to plug the module directly to my smartphone. Without any modification and without needing any application, I can now have a mouse/keyboard or joystick on my phone.
That’s it for now. Ultimately I would add more buttons to it and work on the deadzone for the joystick – at the moment it is a simple threshold which reduces the dynamic range.
Intéressant, surtout pour la CNC.